
12 Expert Tips on How to Take Your Own Newborn Photos at Home
Want to capture stunning newborn photos without hiring a professional photographer? With the right preparation, simple techniques, and your smartphone camera, you can create beautiful, heartfelt images of your baby that you’ll treasure forever.
The first days and weeks with your newborn are incredibly precious—and they pass by in the blink of an eye. While professional newborn photography sessions can cost $300-$1,500+, you can achieve amazing results at home with just a little know-how and patience.
This comprehensive guide will teach you everything you need to know about DIY newborn photography, from optimal timing and lighting to safe posing techniques and editing tips. Whether you’re a first-time parent or adding to your growing family, these expert tips will help you capture this fleeting season beautifully.

Why Take Your Own Newborn Photos?
Before diving into the how-to, let’s talk about why DIY newborn photography is worth considering:
Cost Savings: Professional newborn sessions can be expensive. Taking your own photos saves hundreds of dollars while still creating meaningful keepsakes.
Comfort and Convenience: Photograph your baby in the comfort of home without the stress of traveling with a newborn or working around a photographer’s schedule.
Authenticity: Home photos often capture more genuine, intimate moments than studio sessions. The environment is familiar, relaxed, and truly yours.
Flexibility: Work at your baby’s pace without time constraints. Take breaks whenever needed and spread sessions across multiple days.
Learning Experience: Developing basic photography skills gives you the ability to document your child’s growth throughout their entire childhood.
Immediate Gratification: No waiting weeks for edited photos. You can share images with family and friends right away.
Tip 1: Perfect Your Timing
The Ideal Age Window
The sweet spot for newborn photography is within the first 5-14 days after birth. Here’s why:
Days 1-5:
- Baby is still very curly from the womb
- Extremely sleepy (making posing easier)
- Skin may be flaky or have newborn rash
- You might be too exhausted
Days 5-14 (OPTIMAL):
- Baby’s skin has cleared up
- Still very sleepy and curl naturally
- You’ve had time to recover slightly
- Baby hasn’t “woken up” to the world yet
- Less likely to have baby acne
Days 14-21:
- Still possible to get great shots
- Baby is more alert and may fuss more
- Won’t curl as tightly
- More awake periods
After 21 Days:
- Focus on lifestyle shots rather than posed newborn photos
- Capture awake, alert expressions
- Document daily routines and interactions
Pro Tip: Schedule your photo session for 30-60 minutes after a feeding when baby is full, content, and drowsy.

Tip 2: Master Natural Lighting
Lighting is the single most important element in beautiful newborn photography. Natural light creates soft, flattering images that feel warm and organic.
Finding the Best Light Source
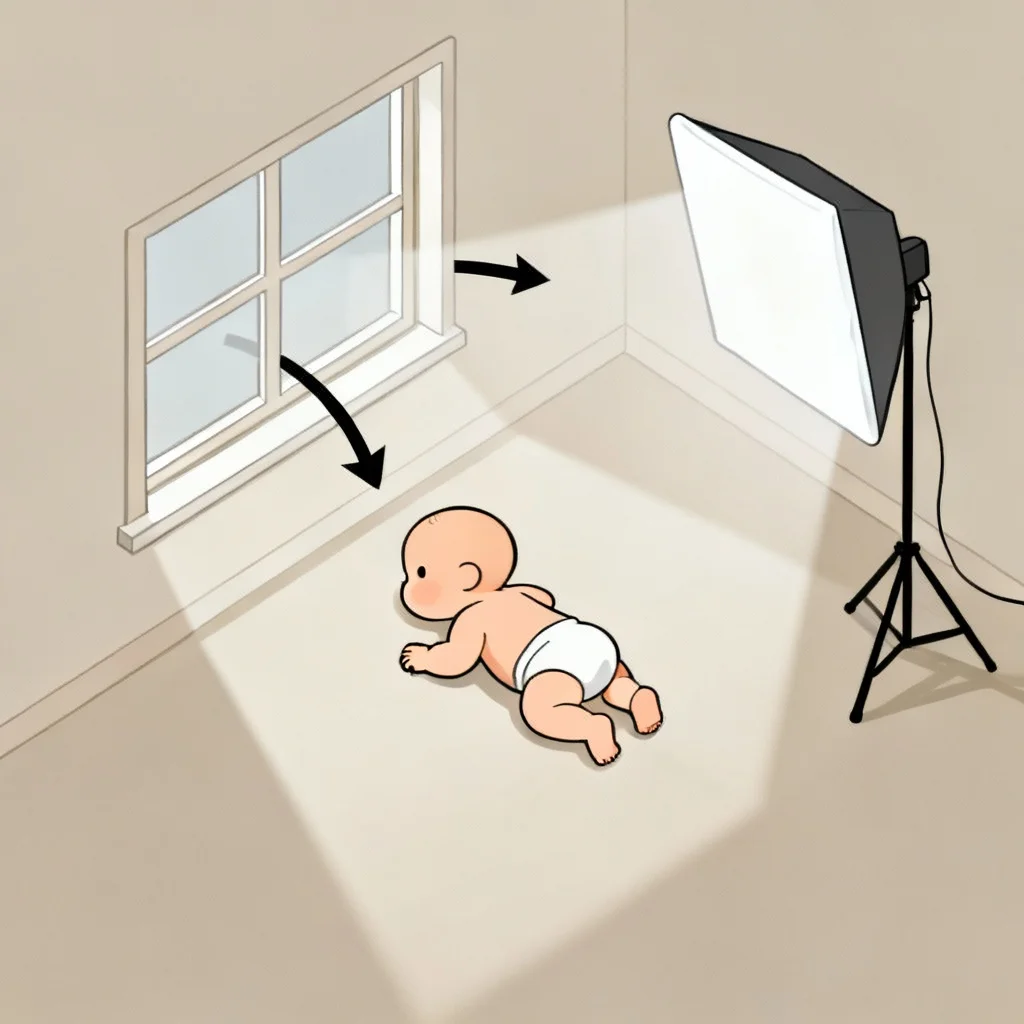
Window Light is Your Best Friend:
- Large windows provide diffused, even light
- North-facing windows offer consistent light all day
- South-facing windows provide bright, warm light
- Avoid direct harsh sunlight streaming in
Optimal Window Setup:
- Position baby perpendicular to the window
- Light should come from the side, not directly above
- Baby’s face should be toward the light source
- Avoid placing baby directly in front of window (backlit)
Room Preparation:
Use white or light-colored walls to reflect light
Turn off ALL artificial lights (lamps, overhead lights)
Open curtains and blinds completely
Remove any colored items near the window (they cast color)
Tip 3: Prepare Your Space and Props Thoughtfully
Creating a Simple, Beautiful Background
Background Colors That Work:
- Pure white (timeless, clean, classic)
- Cream or ivory (warm, soft, organic)
- Light gray (modern, sophisticated)
- Soft pastels (gentle, sweet)
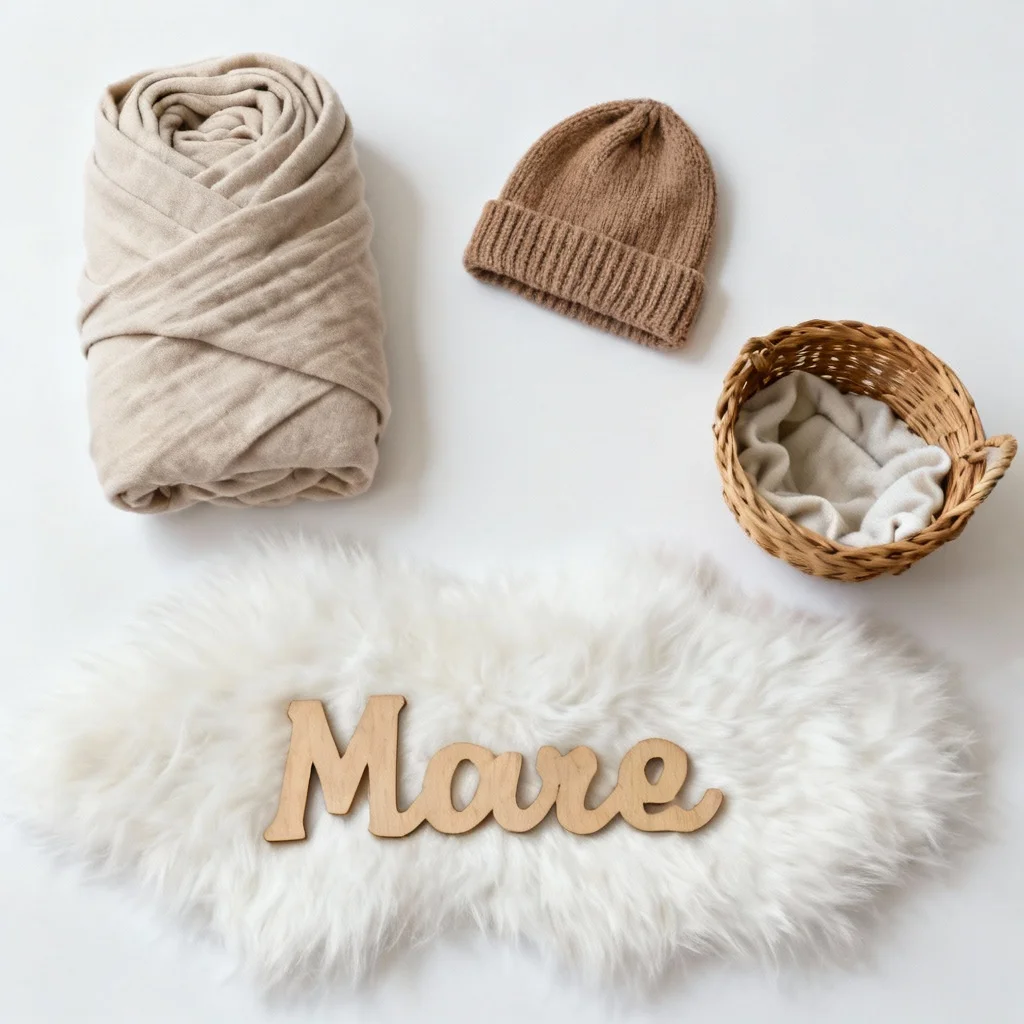
Background Materials:
- Fitted white bed sheets (wrinkle-free is key)
- Large knit blankets or throws
- Fur or faux fur rugs (texture interest)
- Muslin swaddle blankets (layered)
- Textured fabrics (cable knit, chunky weave)
Background Setup Tips:
- Iron or steam fabrics to remove wrinkles
- Pull fabric taut and secure with clips or tape
- Layer different textures for depth
- Keep it simple—baby is the focus, not props
Essential Props for Newborn Photos
Must-Have Props:
Swaddle Blankets:
- Muslin wraps in neutral colors
- Stretchy jersey knit swaddles
- Keep baby feeling secure
- Create clean, wrapped look
Baskets and Bowls:
- Wicker baskets (line with soft padding)
- Wooden bowls or crates
- Metal tubs or buckets
- Always add soft blankets inside for comfort
Composite Photos: For shots where baby appears to be held up by hands or in precarious positions, these are composite images (two photos merged together). Unless you know Photoshop, stick to safe, simple poses.
Tip 4: Use Safe and Simple Poses
Safety is paramount in newborn photography. Avoid complex poses that require editing skills or could put your baby at risk.
Safe Newborn Poses for Beginners
The Classic Back Pose:
- Baby lying on back on soft blanket
- Arms up by head or resting on tummy
- Legs can be extended or gently bent
- Safety: Completely safe, no risk
- Tip: Shoot from above baby’s head looking down

Tummy Time Pose:
- Baby on tummy with head turned to side
- Arms tucked under chest
- Only if baby can lift head slightly
- Safety: Always supervise, brief sessions only
- Tip: Get down to baby’s level for the shot
Side Lying Pose:
- Baby lying on side in fetal position
- Hands under cheek or near face
- Knees pulled up toward chest
- Safety: Very safe, mimics womb position
- Tip: Use rolled blankets behind back for support

Parent and Sibling Poses
Parent Holding Baby:
- Mom or Dad holding baby against chest
- Shoot over parent’s shoulder showing baby’s face
- Parent’s hands cradling baby’s head
- Capture from side showing parent and baby’s profile
- Safety: Very safe, natural bonding moment
Detail Shots with Parent:
- Baby’s tiny hand wrapped around parent’s finger
- Baby’s feet in parent’s hands
- Parent’s hand on baby’s head
- Size comparison shots
- Safety: Completely safe

Tip 5: Master Camera Angles and Focus
The angle from which you shoot dramatically impacts how your photos turn out. Here’s how to get the most flattering shots.
Best Angles for Different Shots
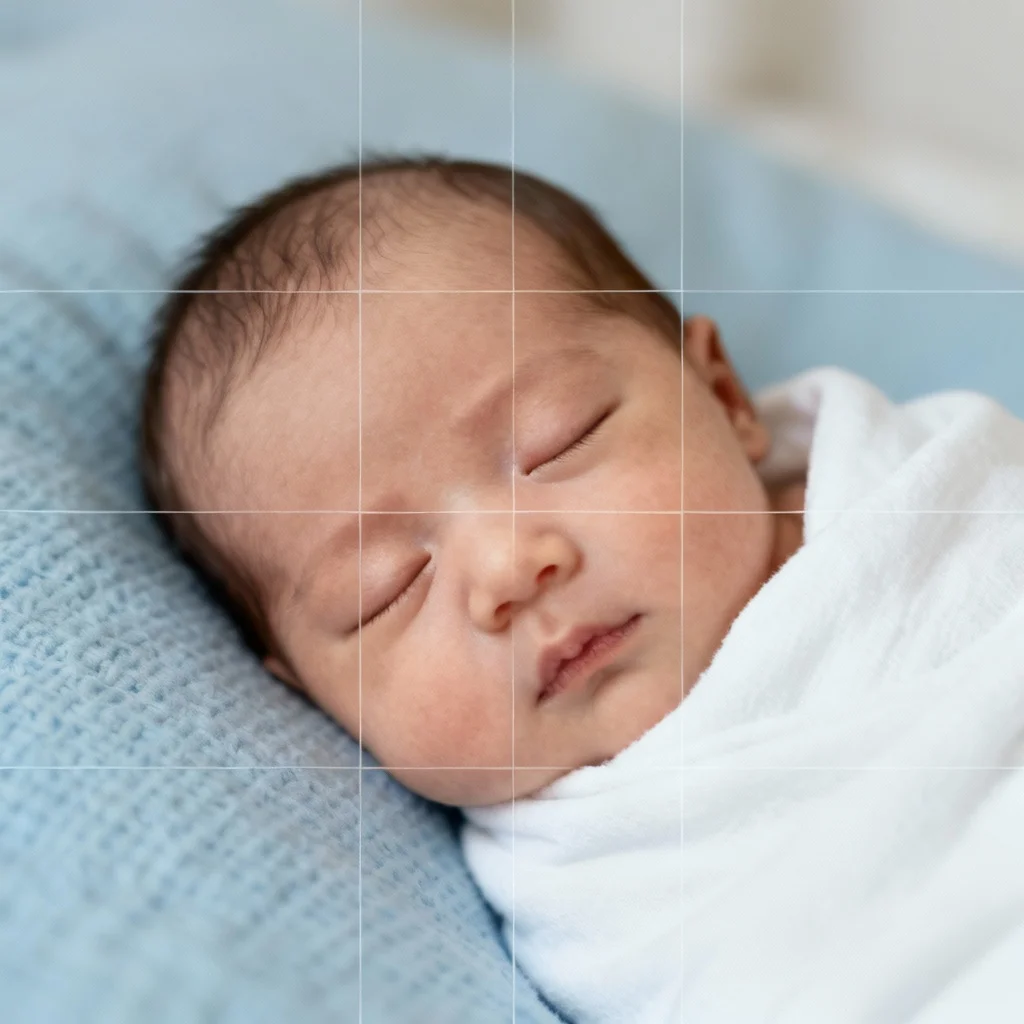
Face and Head Shots:
- Shoot from above baby’s head, looking down
- Camera should be positioned above and slightly to the side
- This is the most flattering angle for baby’s features
- Avoids distortion that happens when shooting from the side at face level
- Captures those sweet sleeping faces perfectly

Full Body Shots:
- Works beautifully for wrapped or swaddled poses
- Get down to baby’s level and shoot from the side
- Camera parallel to baby’s body
- Shows baby’s size and proportions accurately
Detail Close-Ups:
- Get very close to fill the frame with the detail
- Focus on just the toes, fingers, lips, eyelashes, etc.
- These shots are powerful because of their simplicity
- Shoot from various angles to find the most interesting perspective
Tip 6: Capture Precious Details and Tiny Features
Some of the most treasured newborn photos are the close-up detail shots that capture how impossibly tiny your baby is.
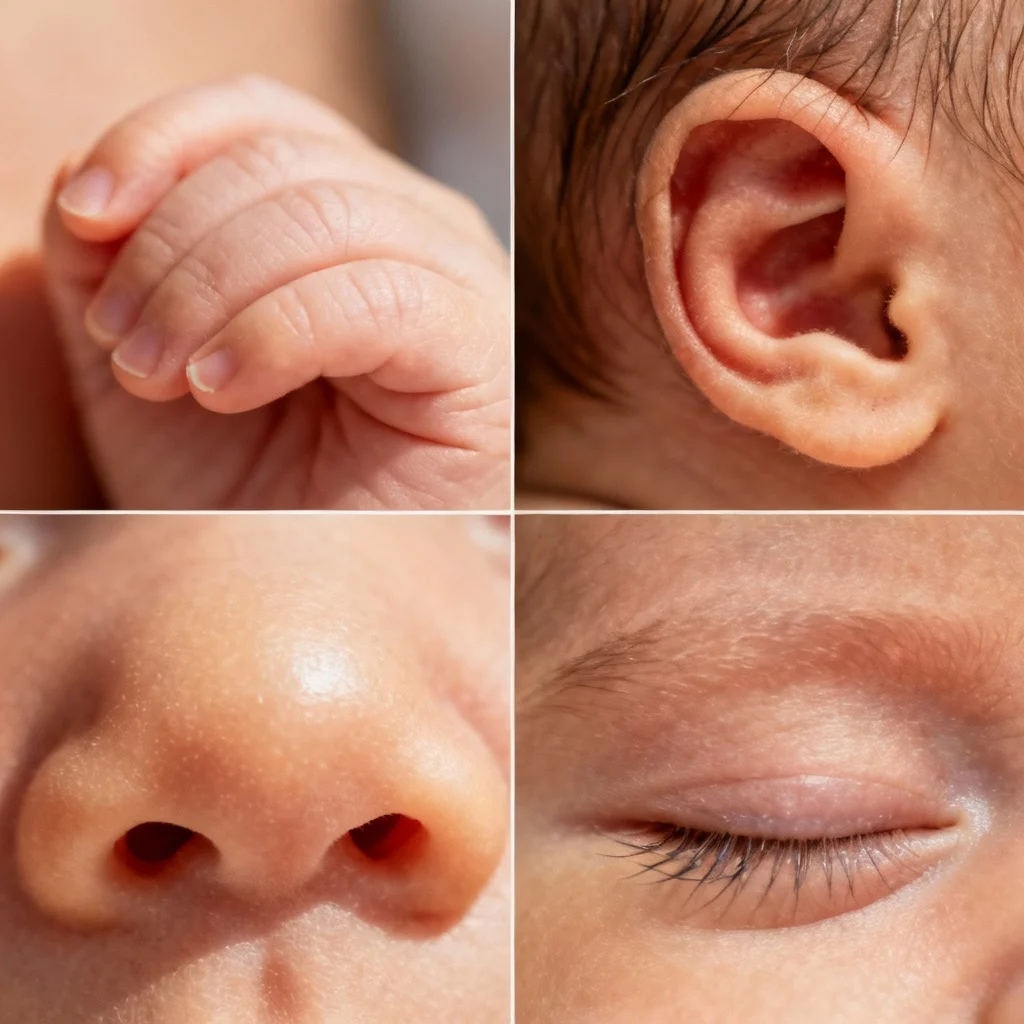
Must-Capture Details
Tiny Body Parts:
- Toes: All ten toes in a row, bottom of feet, curled toes
- Fingers: Tiny fingernails, whole hand, wrapped around your finger
- Ears: Those perfect little ears with all their curves
- Lips: Pouty newborn lips, especially during sleep
- Nose: That tiny button nose
- Eyelashes: Delicate lashes against soft cheeks

Facial Features:
- Closed sleeping eyes
- Peaceful sleeping expression
- Tiny yawns (have camera ready!)
- Baby stretches
- Scrunched-up serious faces
- Content, milk-drunk expressions
Unique Characteristics:
- Birthmarks
- Baby hair patterns (or adorable baldness)
- Folded ears
- Wrinkly newborn skin
- Vernix (if present in first days)
Size and Scale Shots:
- Baby’s hand against parent’s hand
- Baby’s foot in parent’s palm
- Baby’s whole body length compared to parent’s arm
- Baby in oversized clothes or parent’s shirt
- Baby next to meaningful objects
Tip 7: Take Plenty of Photos (And Keep Shooting!)
The beauty of digital photography is unlimited shots without cost. Use this to your advantage!
Why Quantity Matters
You’ll Delete More Than You Keep:
- Baby moved and image is blurry
- Focus is slightly off
- Lighting isn’t quite right
- Expression isn’t the one you wanted
- Background has distractions
Perfect Moments Are Fleeting:
- Baby’s expressions change in seconds
- That perfect yawn lasts half a second
- Sweet stretches happen quickly
- You might miss it if you only take one shot

After the Session:
- Upload all photos to computer for better viewing
- Create a folder for that specific session
- Mark favorites with stars or flags
- Delete blurry, out-of-focus, or duplicate shots
- Keep selection broad initially—you can narrow later
Tip 8: Edit Your Photos to Perfection
Editing is where good photos become great. Even simple adjustments can dramatically improve your images.
Best Free Editing Apps
For iPhone:
- Native Photos App: Built-in, surprisingly powerful
- VSCO: Beautiful filters, professional tools
- Snapseed: Advanced editing, completely free
- Lightroom Mobile: Professional-grade, free version available
For Android:
- Snapseed: Google’s powerful editing app
- Lightroom Mobile: Adobe’s professional app
- PicsArt: User-friendly with many options
- Pixlr: Quick and effective
Basic Edits That Make a Big Difference
1. Exposure and Brightness:
- Brighten slightly to create airy, light feel
- Avoid making it too bright (blown-out whites)
- Newborn photos look best slightly overexposed rather than underexposed
2. Contrast:
- Add a touch of contrast for definition
- Don’t overdo it—keeps skin looking soft
- Subtle adjustments work best
3. Warmth/Temperature:
- Warm up images slightly for cozy feel
- Cool down if images look too yellow
- Aim for natural skin tones
4. Highlights and Shadows:
- Bring down highlights if whites are too bright
- Lift shadows to see details in darker areas
- Creates even, balanced lighting
5. Sharpness:
- Sharpen very slightly for crisp details
- Don’t over-sharpen (creates harsh, unnatural look)
- Focus sharpening on baby’s face
6. Saturation:
- Reduce saturation slightly for softer look
- Newborn photos look best with muted tones
- Avoid oversaturated, unrealistic colors

Tip 9: Include Lifestyle and Candid Moments
While posed sleeping photos are beautiful, don’t forget to capture real life with your newborn.
Morning Routine:
- First diaper change of the day
- Morning feeding
- Sleepy stretches
- Sunrise light through window
Throughout the Day:
- Tummy time on play mat
- Baby in bouncer or swing
- Looking out the window
- Lying on parent’s chest
Evening Moments:
- Swaddling for sleep
- Bath time (careful with phone near water!)
- Bedtime routine
- Final feeding of the day
Parents with Baby:
- Dad holding baby skin-to-skin
- Mom nursing or bottle-feeding
- Both parents looking at baby together
- Reading to baby Singing lullabies
Home Environment Shots
Nursery Details:
- Baby in crib
- Nursery decor
- Rocking chair with baby
- Hanging clothes
- Toys and books waiting
Meaningful Spaces:
- Baby on parents’ bed
- In favorite spot of the house
- Where you spend most time
- Special corners of home
Siblings:
- Big brother or sister meeting baby
- Gentle touches and kisses
- Helping with care routines
- Playing near baby Protective moments
Extended Family:
- Grandparents meeting baby for first time
- Aunts and uncles visiting
- Family gatherings Video calls with distant relatives


Tip 10: Use Props and Accessories Strategically
Props can enhance your photos when used thoughtfully, but baby should always remain the focus.
Props Work Well When:
- They add meaning (family heirloom blanket)
- They show scale (parent’s wedding ring)
- They tell a story (favorite book)
- They add texture without distraction
- They’re simple and neutral
- Skip Props When:
- They overpower the baby
- They’re brightly colored or busy
- They’re uncomfortable for baby
- They require unsafe positioning
- They look forced or cluttered
Best Props for DIY Newborn Photos
Baskets and Containers:
- Must be sturdy and stable
- Line heavily with soft blankets
- Keep props low to ground
- Never walk away while baby is in basket
- Meaningful Objects:
- Books you want to read to baby
- Sports equipment (if parents are fans)
- Musical instruments
- Hobby-related items


Tip 11: Work with Baby’s Natural Rhythms
Understanding Baby’s Schedule
Best Times for Photos:
- After a full feeding
- 20-30 minutes into deep sleep
- During calm, alert periods (for awake shots)
- When baby is content and comfortable
Times to Avoid:
- When baby is overtired
- Right before typical fussy periods
- During growth spurts
- When baby is showing hunger cues
Signs Baby is Ready:
- Deeply asleep, relaxed body
- Content expression
- Regular breathing
- Peaceful demeanor
Signs to Stop:
- Fussing or crying
- Stiff or tense body
- Rooting or hunger cues
- Startling easily
- Unhappy expressions


Tip 12: Capture Awake and Alert Moments
While sleeping newborn photos are classic, awake photos showing your baby’s personality are equally precious.
When Baby is Alert
Timing:
- Usually happens 1-2 hours after feeding
- Brief windows in newborn stage (15-30 minutes)
- Becomes longer as baby grows
- Often happens in late morning or early evening
What to Capture:
- Wide-eyed wonder
- Looking toward light or parent’s voice
- Serious, focused expressions
- Tiny smiles (even if just gas!) Alert curiosity
Tips for Awake Photos
Keep It Simple:
- Baby lying on back is easiest
- Parent holding and engaging with baby
- Close-ups of open eyes
- Profile shots showing alertness
Interaction Photos:
- Talk to baby and capture their response
- Make sounds to get baby looking toward camera
- Parent’s face close to baby’s
- Sibling trying to interact

Final Thoughts on DIY Newborn Photography
Taking your own newborn photos is an incredibly rewarding experience that requires patience, preparation, and flexibility. While you may not achieve the same results as a seasoned professional, the photos you capture will be deeply personal, authentic, and meaningful.
Remember These Key Principles:
Safety First: Never compromise baby’s safety for a photo. Keep poses simple, provide support, and stop if baby is uncomfortable.
Lighting is Everything: Natural window light is your best friend. Turn off artificial lights, diffuse harsh sunlight, and position baby near your best light source.
Simple is Beautiful: You don’t need expensive equipment or elaborate setups. A phone, window light, and soft blankets are enough to create stunning images.
Work with Baby: Follow your baby’s rhythms and cues. The best photos happen when baby is content, not when you force a timeline.
Take Lots of Photos: Shoot freely without worrying about “wasting” shots. You’ll be glad to have options when selecting your favorites.
Edit Thoughtfully: Enhance your images with subtle editing that maintains natural skin tones and authentic feel.
Capture the Details: Don’t forget those tiny features that change so quickly—toes, fingers, ears, and peaceful sleeping faces.
Include Family: Some of the most precious photos show the connections between baby and parents, siblings, and extended family.
Be Patient with Yourself: You’re learning a new skill during an exhausting time. Give yourself grace and celebrate small victories.
Embrace Imperfection: The slightly imperfect, candid moments often become the most cherished photos over time.
These early days with your newborn are fleeting and precious. Whether your photos are technically perfect or not, they document a moment in time that will never come again. The wrinkled blankets, the imperfect lighting, the unexpected expressions—these “flaws” make your photos real and uniquely yours.
Years from now, you won’t remember if the lighting was perfect or the composition was textbook. You’ll remember how tiny your baby was, how much you loved them, and how those first days felt. Your DIY newborn photos will transport you back to this magical, exhausting, wonderful time.
So grab your phone, find some good light, and start capturing these memories. You’ve got this, and your baby is beautiful just as they are. Happy photographing!